 I want to say thank you to my cousin Lindsay for sending me some maple sugar after attending her local Maple Festival in CT! What a treat! It made me realize how much I miss the maple sugaring festivities, yet feel lucky to get a taste of it in the mail! Thank you Lindsay! This stuff is like gold!
Tuesday, March 30, 2010
Northern Gold!
I want to say thank you to my cousin Lindsay for sending me some maple sugar after attending her local Maple Festival in CT! What a treat! It made me realize how much I miss the maple sugaring festivities, yet feel lucky to get a taste of it in the mail! Thank you Lindsay! This stuff is like gold!
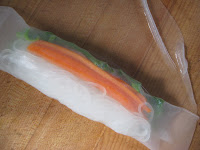
Fresh Spring Rolls!
 It's a little strange considering my direct Scottish roots and my love for Thai food? If this were a "trace your ancestors blog" I would no doubt feature the wonders of haggis and mutton the majority of the time, and most likely you would be reading something else.
 Anyway, despite my heritage, this afternoon I was in the mood for flavors far from my native land. Here they are, fresh spring rolls and peanut sauce humbly thrown together by me and my McClain/Garver/Irwin bloodline.
Peanut Sauce:
*1 1/2 Tbsp organic crunchy peanut butter
*1 Tbsp soy sauce
*1 tsp fresh grated ginger
*1 garlic clove, pressed with garlic press
*1 tsp. honey
*small squeeze fresh lime
*1/4 tsp sesame oil
*dash umeboshi plum vinegar *optional
Blend all ingredients together in a small mixing bowl. Set aside. *These measurements are approximate, taste as you go and adjust flavors. You can add red pepper flakes for more heat

Fresh Spring Rolls:
*6-8 rice spring roll sheets
*1/2 package rice vermicelli
*1 carrot
*1 large fresh lettuce leaf
Put a pot of water over high heat. Peel the carrot, and slice into thin sticks lengthwise. Rinse and dry lettuce and set aside.
When water begins to boil, add vermicelli and cook for about 2-3 minutes. Remove from heat, drain and return to pot with cold water.

Place the spring roll sheets in a large bowl with warm water. They will become tender in about 2 minutes.
Remove a rice sheet from the water and place flat on a work surface. Place a piece of the lettuce in the center of the rice sheet. Pull a small amount of vermicelli from the cold water (about a 1/3 cup) and fold it into a little bundle. Place it on top of the lettuce. Arrange about 5 carrot sticks alongside the vermicelli, trimming them to be the same length as the bundle of vermicelli. Run a line of peanut sauce down the center of the vermicelli.
Wrap the sheet tightly in a roll, folding in the sides as you go. Repeat with remaining ingredients.

Serve with additional peanut sauce....
and a Guinness.
Monday, March 29, 2010
Radish Salad!
 You could almost decorate your Christmas tree with these little beauties! I have grown more and more fond of radishes over the years. Maybe it's because they provide the same thrill as carrots or onions when you tug them out of the soil for harvest. Or maybe because they offer an early garden appetizer for what's to come.
 The French like to have radish slices on buttered baguette (very good I might add). I'm a fan of eating them whole sprinkled with sea salt, or sliced and tossed with their tops and a simple celery dressing. . .

Radish Salad:
*8-10 radishes sliced thin
*1 cup radish greens/tops
*1 1/2 stalks celery plus the leafy greens
*1 garlic clove
*olive oil
*1 tsp umeboshi plum vinegar
Remove tops from radishes. Rinse well. Slice radishes thin and place in a mixing bowl. Mince one celery stalk and add to the bowl. In a blender or food processor, blend the remaining 1/2 celery stalk and it's leaves with the garlic clove, umeboshi vinegar and enough olive oil to create a smooth dressing.
Slice the radish greens thin and add to the bowl with about 3 Tbsp of the dressing. Toss. Season to taste. Serve immediately or refrigerate covered.


*Radish facts:
Radishes, Raphanus stivus, includes a greek discriptive for "quickly appearing".
These little globes are packed with vitamins and minerals such as vitamin B6, riboflavin, magnesium, copper, calcium, ascorbic acid, folic acid and potassium.
Radishes have been used in alternative medicine to treat whooping cough, gastric issues, gallstones, kidney stones, intestinal parasites and liver problems.
The wild radish contains 48% oil, although not good for eating, this oil may be considered for biofuel. Nice!
Sunday, March 28, 2010
Raspberry and Dried Cherry Cake. . .
 I first spotted this recipe in Food and Wine, and had to try it. It was originally sourced from Istanbul's acclaimed chef Mehmet Gurs' Scandinavian grandmother. Although it calls for raspberries and figs, I happened to have frozen raspberries, and dried cherries instead. It was incredible! The raspberries and cherries were tart and the cake sweet. Gurs sprinkled the finished product with fresh lavender and powdered sugar. Very pretty!
 Raspberry and Dried Cherry Cake- Adapted from Mehmet Gurs Original:
*dry bread crumbs for dusting
*1 cup fine raw cane sugar, (you could experiment with honey too)
*1 stick organic unsalted butter, room temp
*3 eggs
*zest of 1 lemon
*1 1/2 cup unbleached organic flour
*juice of 1 lemon
*1/2 pint raspberries (I used our frozen raspberries from last summer- unthawed, worked great)
*1/2 cup unsweetened dried cherries or 4 figs cut into eighths, or 1/2 pint additional raspberries
Preheat oven to 350. Butter a 9 inch springform pan, or try in a cast iron skillet as Gurs' grandmother did. Sprinkle with the breadcrumbs to coat. Beat the sugar and eggs with a handheld mixer in a large mixing bowl on high speed, until fluffy, about 2 minutes. Beat in the butter and the zest. At low speed slowly add the flour and lemon juice, alternating between the two until just incorporated. Blend the rest with a rubber spatula.
Pour the batter into the pan. Sprinkle the fruit over top, and gently press into the batter.
Bake on the bottom third of the oven for 40 minutes. Transfer to the top third of the oven and bake for another 35 minutes or until a cake tester comes out clean.
Transfer to a wire rack to cool. Loosen the edges of the cake with a knife and release the springform. Serve warm.
Friday, March 26, 2010
White Bean and Kale Soup!
 I may get a few more soup recipes in before the weather warms up completely. This simple recipe could easily seem plain, but the combination of white beans and kale is a good one! Light and fresh!
White Bean and Kale Soup:
*5 cups chicken stock
*1/2 small sweet onion, minced
*2 cloves garlic, minced
*1 celery stalk, chopped fine
*2 bay leaves
*1 bunch fresh kale, rinsed and chopped
*1-2 cups cooked white beans of your choice
*sea salt and pepper
*1 Tbsp butter or olive for sauteing
In a large soup pot, saute onion, celery and garlic in butter or olive oil for about 7 minutes. Add stock and bay leaves. Season with salt and pepper. Gently simmer for about 15-20 minutes, covered. Add beans. Cook a few more minutes before adding kale. Allow to wilt. Adjust seasonings. Remove from heat and serve.
*Variations- add roasted chicken for a heartier version.
Wednesday, March 24, 2010
Chickweed Pesto!
 Bare with me on this one. I realize how it sounds suggesting you weed your garden and then go make pesto. Honestly though, what could be more resourceful? Spring's tender shoots and other early wild edibles offer some of the first tasty greens of the season, why not partake? Chickweed is easy to identify, and even easier to put on the table given it turns up almost everywhere. Chickweed has been used traditionally throughout herbal medicine to relieve symptoms from eczema and urinary tract infections to rheumatism and wounds. Here is the impressive list of nutritional properties:
Vitamins- A, B6, B12, C, and D
Minerals- iron, calcium, potassium, phosphorus, zinc, manganese, sodium, copper, silica.
Other properties include- beta carotene, and a flavonoid known as rutin, (which is known to increase circulation, is anti-inflammatory and decreases LDL cholesterol).

Chickweed Pesto:
*3 cups fresh chickweed
*3 cloves garlic
*1/2 cup olive oil
*1 tsp sea salt
*fresh ground pepper
*zest from 1/2 lemon
*1/2 cup toasted sunflower seeds, or toasted pine nuts, or pecans, or walnuts. . .whatever you have.
Rinse chickweed well. Spin in a salad spinner to dry. Blend chickweed, garlic, salt, pepper, lemon zest and seeds/nuts in a food processor briefly. With blade still in motion slowly pour in olive oil to create a paste. Serve on meat or fish, toss with roasted fingerling potatoes or pasta or spread on sourdough. Enjoy the taste of Spring!

A book worth investing in..

Monday, March 22, 2010
Childhood Revisited...
 I believe the art of persuasion is learned at a remarkably young age. I became somewhat of a pro in my early years living in Colorado. The stakes were high then. Every time we stopped at the U-Pump-It gas station a few blocks from our house, I was given the opportunity to test my skills. Inside that little store awaited rows of sugary treats that were just impossible to ignore with their colorful, shiny packaging. My dad was the easiest to convince. I think I would even offer to help pay for my treat most of the time, eluding to some sort of "beyond my years" responsibility. When I got the OK, I would stand there carefully selecting my prize. Usually I went for one of three classics, Butterfinger, Skor Bar, or Mounds.
 This memory came rushing back to me as I carefully blended organic coconut with local honey and spread it over a warm puddle of dark chocolate this morning. Look at me, all grown up and still looking for that Mounds bar. It's easier now, no persuading dad. In fact, if he were visiting, he may have been the one encouraging me to fix this one. So here you are grown up children, a blast from the past. . .

Enlightened Mounds:
*2-4 oz high quality dark chocolate, 70% or higher
*1 1/4 cups shredded coconut, unsweetened
*1 tsp. honey
*pinch sea salt

I started with flaked coconut and blended it in the food processor, but you can easily purchase shredded coconut instead.
Mix the coconut, salt and honey in a bowl using your fingertips. Blend thoroughly. Set aside.
Break the chocolate into small pieces and set over a double boiler to melt. You can also just place a metal bowl over a small saucepan with a small amount of boiling water. Melt chocolate. Allow to cool slightly. Pour out onto a baking sheet lined with parchment in one pool. Allow to slightly set up, about 10 minutes. Gently spread the coconut mixture over the chocolate. Fold half of the unused parchment over the coconut and gently press to create a uniform top. Place in fridge to set up completely before cutting into bite sized squares. Enjoy the memories.
Saturday, March 20, 2010
Breakfast of Champions!
 I think breakfast is underrated most of the time. A quick piece of toast with coffee while rushing out the door in the morning just doesn't cut it. Or a pop tart for that matter! Think about this, you ate dinner at 7 the night before, slept for 6-8 hours, you wake up and really what your body needs most is some serious fuel to launch you into the busy day. But refined carbs (the pop tart or toast) are only going to give you a quick surge followed by a steep crash. The answer? Eat a lot of good food in the early hours. It's when the body's digestion is at it's peak, and how breakfast can set the tone for the remainder of the day. This recipe is one of my favorites. Coconut milk, cinnamon, dried fruit, shredded coconut, walnuts, and vanilla are added to cooked brown rice for a warm creamy start to the day. Brown rice is a whole grain (the fibrous hull has not been removed), entering the bloodstream slower than refined carbs. This type of meal burns slow and steady aided by the healthy fat from coconut as it digests. Plus it tastes indulgent to say the least. Lighter than oatmeal, with satisfying texture and substantial staying power.
Morning Coconut Rice Bowl:
*2 cups cooked short grain brown rice
*1/2 cup coconut milk
*1/4 cup water
*1/3 cup shredded coconut, unsweetened
*1/3 cup favorite dried fruit (I like currants, cherries, or raisins)
*1 tsp cinnamon
*1 tsp vanilla
*1 Tbsp flax seeds
*1/4 cup chopped nuts (walnuts, cashews or almonds)
In a small saucepan, combine cooked rice with coconut milk and water over med-low heat. Mix well. Stir in remaining ingredients. Heat through and serve warm.
Friday, March 19, 2010
Nettle and Potato Fritters!
 Spring has officially sprung once nettles reach the table. The nutritious green may be one of my favorite wild edibles and first signs of Spring. There is so much to love about them!
Stinging nettles, (Urtica dioica) grow prolifically without any encouragement, are extremely nutrient dense, and taste wonderful, similar to spinach. We are lucky to have a large patch on our creek bank. Last evening I strolled down to the waters edge for the first harvest. The young tender shoots have less stinging power than when mature, and couldn't possibly taste more vibrant and fresh! Nutritional properties include: vitamins A, C and K, magnesium, calcium, silica, manganese, iron, protein, and potassium. Nettles positive effects on numerous common aliments seem endless. Nursing mothers use nettle to increase milk production, those who suffer from arthritis take nettle to sooth inflammation, and the serotonin and magnesium in nettles offer relief for insomnia. A wiser nutrition friend of mine recently sent along a link to a Chinese herbalist's site, where you can read more about all of the amazing properties of nettles. In the meantime, here is a fantastic recipe for your dining pleasure.

Nettle and Potato Fritters:
*2 large gold potatoes
*1-2 cups lightly steamed nettles
*2 Tbsp grated onion
*2 garlic cloves, pressed with garlic press
*sea salt
*pepper
*1 egg- optional
*olive oil
Boil whole potatoes for about 7 minutes, or until just slightly tender. Steam or wilt nettles. Cool potatoes and grate into a mixing bowl. Grate in the onion and add the pressed garlic. Add the nettles, egg, salt and pepper. Gently mix together. Place a large cast iron skillet over medium heat. Drizzle with olive oil. Spoon about 1/4 cup mixture at a time into pan to create fritters. Allow to brown for about 2 minutes before flipping. Repeat with remaining mixture. Serve warm.
Wednesday, March 17, 2010
Purple Cabbage Purses....
 Being St. Patrick's Day, it was only fitting to include cabbage into this evening's meal. These precious little "purses" are home to a tasty medley of black eyed peas, brown rice, veggies, currants, chopped walnuts and gorgonzola. Maybe not entirely Irish, but tradition worthy none the less.
Purple Cabbage Purses:
*1 cup cooked brown rice
*1/2 cup cooked black eyed peas
*1/3 cup chopped sweet onion, chopped
*2 celery ribs, chopped
*1 carrot, diced
*1/4 cup walnuts, chopped
*2 Tbsp. dried currants (or favorite dried fruit)
*3 cloves garlic, minced
*1 tsp. chopped rosemary
*1 Tbsp. red wine
*10-12 small purple cabbage leaves
*1 Tbsp. gorgonzola
*salt and pepper
*olive oil for sauteing

Saute onion, celery, carrot and garlic in a medium skillet drizzled with olive oil. Add red wine. Stir. Add rice, black eyed peas, rosemary, salt and pepper. Remove from heat. Stir in currants and chopped walnuts.
Bring 2 inches of water to boil in a large pot outfitted with a steam basket. Use the smaller leaves from the cabbage, about the size of your palm. Place cabbage leaves in steam basket once water begins to boil. Cover and steam for about 4 minutes. Spoon about 1-2 Tbsp. rice mixture into a cabbage leaf. Sprinkle with a very small amount gorgonzola. Pinch together to create a "purse". Repeat with remaining leaves. Serve warm. Drizzle with balsamic vinegar if your heart desires.
An alternative ending. . . roll the stuffed leaves instead, delicious either way!

Monday, March 15, 2010
Portabella Sprout Burgers....
 Sprouted mushroom burgers, could I possibly sound more like a hippy? Indeed I could once I mention they are vegan and gluten-free. Maybe I should just buy a VW bus and hit the open road?
 Yes, these burgers are earthy, but I do believe they will appeal to more than just us Grateful Dead lovers. In fact, they are very, very flavorful. All you need is a portabella mushroom, some sprouted peas/beans, and you're halfway there.

Portabella Sprout Burgers:
*1 large portabella mushroom, chopped fine
*1 1/2 cups sprouted mix, such as adzuki, lentils and peas, (you can make your own or buy them in the refrigerated section of most grocery stores)
*1/2 sweet onion, chopped
*3 cloves garlic, minced
*2 celery stalks, chopped
*2 tsp. cumin
*1 tsp soy sauce
*sea salt and pepper
*1/3 cup organic cornmeal, finely ground
*olive oil for sauteing

In a heavy skillet saute onion and celery over medium heat. Add garlic and chopped mushroom. Saute until just tender, about 5 minutes. Season with salt, pepper and 1 tsp. cumin. In a food processor or blender, blend 1 cup sprout mix with 1/2 of the sauteed mixture. Place in a large bowl with remaining ingredients. Blend together adding a drizzle of olive oil. Reheat skillet over medium heat and coat with olive oil. Packing mixture together as you go, shape into patties. Place in pan and gently flatten with the back of a spatula, you may need to encourage them to keep their shape at first until they start to brown up. Allow each side to crisp and

brown, about 4 minutes per side. Serve with mustard and all the fixings.
"So Heady!"
Sunday, March 14, 2010
Sunday Pumpkin Bread!
 My fellow foodie friend Virginia knows how to do things the southern way. Large weekend breakfasts with plenty of homemade dishes such as her french toast casserole (my favorite of hers), greens, biscuits, free flowing coffee, and ample hospitality. Years ago when I was searching for a good banana bread recipe, all I had to do was request one from her. She gave it to me on a beautiful post card photo of old tea pots. Every time I go to the recipe box, this one jumps right out.
 This morning, with a hankering for banana bread, but no bananas, I used a can of organic pumpkin instead. A great start to a rainy Sunday.

Sunday Pumpkin Bread: Adapted from Virginia Allen's Post Card Recipe
*1 cup AP flour
*1 cup whole wheat flour
*1/2 cup butter, room temp
*1/2 cup organic brown sugar or honey
*2 eggs, beaten
*1/4 tsp. salt
*1 tsp. baking soda
*pinch ground cloves
*1/2 tsp. cinnamon
*pinch ground ginger
*1 15 oz can organic pumpkin

Grease a 9x5'' loaf pan. Preheat oven to 350.
In a medium bowl, mix together all dry ingredients. Beat together the butter and brown sugar in a separate bowl. Stir in the eggs and then the pumpkin. Gently fold the pumpkin mixture into the flour mixture until fully blended. Pour the batter into the loaf pan and bake for about an hour "or until your poking device comes out clean". Cool for 10 minutes before turning out onto a wire rack.
*For a gluten free version, substitute the flour with Pamela's Baking Mix, and leave out the salt and baking soda.*
Saturday, March 13, 2010
Walnut Pesto Kale. . .

Kale is a priceless green, taking to different flavor combinations with noteworthy ability. I have already posted one of my favorite preparations, sesame ginger kale, here is another one for you using walnut pesto. An added plus, even the jovial and light hearted FDA "approves" walnuts as part of an effective defense against heart disease, and I quote: "Supportive but not conclusive research shows that eating 1.5 oz of walnuts per day, as part of a low saturated fat and low cholesterol diet, and not resulting in increased caloric intake may reduce the risk of coronary heart disease."
Can't you just picture the FDA all sitting there at the dinner table with their little rulers and scales. They would be a hilarious to have over for a meal. Anyway, my point is, even if this "laid back group" recognizes the power of omega 3's (present in walnuts) and their ability to lower LDL cholesterol, we're on to something. Not to mention all the nutritional benefits of kale, the holy green of the health food world, with it's high calcium content, anti-inflammatory properties, vitamin K & C, beta carotene, cancer fighting ability and powerful antioxidants.
Walnut Pesto Kale:
*1 bunch fresh kale
*2 cloves garlic
*1/2 cup whole walnuts, plus 2 Tbsp
*1 lemon
*1 Tbsp butter or olive oil
*sea salt and garlic
Rinse kale, chop and remove tough stems. In a food processor or blender, briefly pulse the 1/2 c walnuts with the garlic, a pinch of sea salt and pepper. Do not over blend or you will end up with walnut paste. Place a large skillet or pot over medium heat. Add butter or olive oil. Saute the kale until your desired tenderness, adding a bit of water to wilt. Remove from heat. Stir in the walnut mixture with zest from 1/2 the lemon. Stir. Chop the additional 2 Tbsp whole walnuts and sprinkle over top. You can add a bit of high quality parmesan shavings before serving as a variation. Enjoy!
Friday, March 12, 2010
Corn Chowder!
 As Springtime weather gradually makes it's misty approach into the Carolina mountains, scratch made soup continues to warm and satisfy on the damp, cold afternoons. Yesterday was one of these days, with on and off drizzle, a bit of a chill, and all of the neighborhood birds testing their vocals for warmer days.
 As my friend and I chatted while working outside, our conversation naturally took a turn toward food. And then soup. Her favorite is corn chowder. As soon as she uttered the words, I knew what I would be doing when I got home. In usual me fashion, I didn't patiently wait for her to send along the recipe, and went for it blind. I am so glad I did, because it was just what the afternoon called for. Flavorful, creamy, and deeply warming.
Corn Chowder:
*1/2 large sweet onion, chopped
*2 celery stalks, chopped, plus any additional celery leaves, chopped
*2 cloves garlic, minced
*2 Tbsp butter or olive oil
*3 gold potatoes, chopped
*1 bag frozen organic sweet corn
*5-6 cups chicken stock
*salt and pepper to taste
In a heavy soup pot, melt butter over medium heat. Saute onion, celery and potato, for about 10 minutes. Season with salt and pepper. Stir in garlic. Add stock and corn. Simmer until all flavors marry, about 30 minutes. Adjust seasonings. Remove from heat and allow to cool. Transfer about 3-4 cups of the soup to a food processor or blender, and blend until smooth. Return to soup pot and stir. Rewarm. Ladle into bowls and sprinkle with chopped parsley.
*Blending a portion of the soup creates a creamy texture without dairy. You can do this with many other soups to create the same outcome.
Also, using homemade stock really increases the satisfaction factor of soup. If you roast whole chickens on occasion, (or any other kind of meat with bones), remember to save the bones and store in the freezer for stock. I had a lovely organic chicken carcass in the freezer, which I credit for this soup's rich flavor.*
Thursday, March 11, 2010
Gluten-Free People, Come Hither!
 Originally discovered on epicurious.com by my older and wiser sister, this recipe is a best kept secret for those who go about their daily lives sans gluten. Chickpea flour (which is very easy to find in most grocery stores), has incredible flavor and becomes a crispy, chewy crust for pizza or flatbread when mixed with nothing more than sea salt and water. My sister made some for me when I visited, topping them with parmesan, garlic, kalamata olives, and shallots. Last night I tried my hand at it, using fresh mozzarella, garden marinara sauce, beet greens, pesto and sweet onion. Delicious!
 Though my sister is a bit more practiced at getting the crust just right, I got the hang of it by the second and third pizza. I think this may be a new fallback recipe for my household. Thanks Becky!
Chickpea Crust for Pizza or Flatbread:
*1 2/3 cup chickpea flour
*1/2 tsp sea salt
* 2 cups water
*olive oil for pan

In a medium bowl, mix flour and salt with 1 cup water. Whisk well until smooth. Add remaining water and any herbs you like. Allow to sit for 15 minutes.
Heat oven to broil. On stove top, place a cast iron skillet over medium heat. Coat with olive oil. Pour about a 1/2 cup of batter into pan, adding more to cover surface evenly. Allow to cook until top is dry, about 5 minutes. Add toppings, making sure they are not too wet (go light on sauce if using it). Place under broiler until top is crisp and edges of crust are brown. Remove from heat, loosen with a fork on all sides and slide onto a cutting board. Slice and serve hot while repeating with remaining batter.

Try an assortment of toppings and enjoy!
Tuesday, March 9, 2010
Baked Apples!
 These baked apples serve a few purposes: they're nourishing, a pleasure to eat, and make your home smell like a dream. Cinnamon, clove, walnuts, dried currants, flame raisins, coconut and butter fill these crisp fruits with the finest potpourri!
Baked Apples:
*2-4 crisp apples (your favorite)
*1/4 cup walnuts, chopped
*handful dried currants
*handful flame raisins
*1/4 cup unsweetened coconut flakes
*pinch ground cinnamon
*pinch ground clove
*1 Tbsp unsalted butter, room temp

Preheat oven to 350. Rinse apples. Cut the core from apples. Cut away a bit extra to create space for filling. Dice this extra cut out portion for filling. Place cored apples on a lined baked sheet or small oven safe dish. In a small bowl, mix together diced apple, coconut, raisins, currants, walnuts and spices. Using your fingertips, blend in the butter until well incorporated. Pack mixture into the prepared apples. Bake on center rack until apples are tender, about 30 minutes. Enjoy the baking aromatics. Cool slightly before serving.
Monday, March 8, 2010
Amuse Bouche!

Yes, you have officially died and gone to heaven!
Local Chevre Stuffed Dates:
*1/2 cup dried, pitted dates
*4-5 Tbsp soft local goat cheese
*1 tsp. black sesame seeds

Slice the dates lengthwise. Place the goat cheese in the corner of a small ziplock bag. Cut off the tip of the bag. Pipe into date halves, and sprinkle with sesame seeds. Great as a pre dinner "mouth amuser".

It's the simple things in life!
Sunday, March 7, 2010
Collard Greens with Local Procuttio!
 We are lucky to live near so many small farms in WNC. One of the most well known, Hickory Nut Gap Farm, supplies many of Asheville's progressive restaurants and health food stores with their superb pastured meats. Not long ago they started making their own prosciutto, a timely air curing process, limiting its availability. When a batch is ready, it usually doesn't last long before the word gets out and it's gone. That's why I was quick to put in an order for some when my friend called from the farm asking if I wanted anything.
 Here it graces apple and mustard seasoned collard greens. A fine match to say the least!

Collard Greens with Local Prosciutto:
*1 Bunch fresh collard greens
*1/2 apple, chopped
*1/2 small sweet onion, chopped
*1 celery stalk, chopped
*1-2 Tbsp butter
*1 Tbsp mustard
*1 tsp apple cider vinegar
*salt and pepper
Rinse collards and chop away thick portion of stem and spine. Chop. In a heavy pot, saute onion and celery in the butter. Add apple, salt and pepper. Mix in the collards and mustard. Cook down covered for about 5 minutes. Add the apple cider vinegar and additional salt and pepper to taste, remembering that

the prosciutto will contribute most of the salt. Saute until your desired tenderness. Remove from heat, divide onto serving plates and top with pieces of the prosciutto.
Saturday, March 6, 2010
The Perfect Nibble....
 Around 4pm everyday it strikes...the post lunch, pre dinner nibble craving. This is why I usually keep some tamari almonds in the pantry. A handful of these, and a big glass of spring water will set it all straight. Many flavored store-bought nuts contain weird oils and are heavy on the salt, so I just buy bulk raw almonds and do it myself.
 Though referred to as a nut, almonds are actually the inside of the pit from the almond tree fruit, related to other stone fruits such as the peach. Almonds are well known today as wonderful sources of vitamin E, calcium, magnesium and important phytochemicals associated with heart disease, cancer, and diabetes prevention. The ancient principles of Ayurveda associate almonds with high intellectual activity and longevity, due to the presence of omega 6 fatty acids which nourish the brain and nervous system. If this isn't enough, the monounsaturated fats in almonds lower LDL cholesterol levels, strengthen the immune system, and calm inflammation.
Plus it only takes about 10 minutes to complete this recipe, the perfect nibble indeed.


Here it is:
Tamari Almonds:
*1 1/2 cups raw almonds
*1 Tbsp high quality tamari or soy sauce
Preheat oven to 350. Line a baking sheet with parchment. In a medium bowl, toss almonds with tamari. Spread out on baking sheet and bake until toasted, about 10-12 minutes, stirring occasionally throughout process.
Remove from oven, stir and cool completely.


Presto! You're done!
Subscribe to:
Posts (Atom)